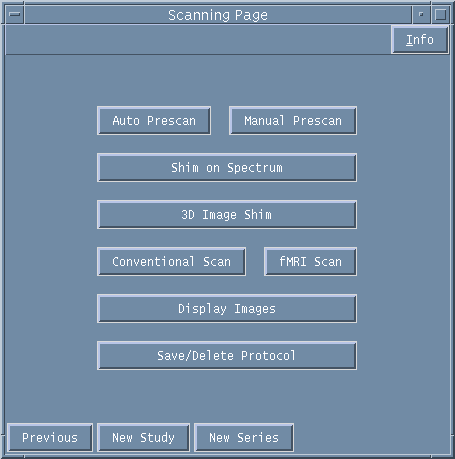
Scanning Page
Before acquiring the prescribed scan you will first need to calibrate the system for optimal imaging by setting the correct Shim values for a homogeneous region of interest (using Shim options) and then by setting the Centre Frequency, Transmit Power and Receiver Gain required (using Prescan options).
From the scanning page you can execute the Shimming, Pre-scanning and the Scanning.
You are also able to Display the acquired images and Save new protocols or Delete existing protocols.
When the scan is complete, you can also move onto a New Study or a New Series from the Scanning Page.

Figure 1. Scanning Page window.
AUTO PRESCAN and MANUAL PRESCAN: Pre-scanning is the process to determine the centre frequency of the nucleus under examination, the transmit power required for maximum signal and to set an optimal receiver gain. This can be executed in either an automated or a manual way. Routinely the automated prescan would be the method of choice. Note that for Echo Planar Imaging (EPI) scans, it is advisable to "tweak" the gradient timing using the EPI Tweaker window.
See the section on Pre-scanning for a full description of pre-scanning.
SHIM ON SPECTRUM: Shims are sets of coils inside the magnet that induce changes in the shape of the magnetic field if the amount of current flowing through them is altered. Each shim coil produces a specific change. Adjusting the shim values to obtain good field homogeneity is vital for producing optimal images. This shim adjustment can be performed using a manual method of shimming on spectra (or FID) or by using an automated image based shimming method with minimal intervention.
See the section on Spectrum Shim for a full description of shimming on a spectrum/FID, and the section on 3D Image Based Shimming for a full description of image based shimming.
CONVENTIONAL SCAN: Once the Shim and Prescan calibrations have been completed the scan can be acquired. Select the Conventional Scan button to initiate any scan other than a Functional Scan.
There is a time delay as the scan prescription is downloaded and the system computes various parameters such as the strength needed for the slice select, phase encode and frequency encode gradients. At this point the Acquisition Status box at the top right of the scanning console changes from "Idle" to "Active". When the scan starts this then changes again to "Acquiring" for the duration of the scan.
Note on Aborting a Scan
To abort the scan at any stage of the acquisition press the ABORT ACQ button on the left of the main Vnmr menu bar.
![]()
Figure 2. Main Vnmr menu bar.
fMRI SCAN: The method for prescribing a functional MRI scan is the same as for a conventional scan but additional time series instructions need to be prescribed (e.g., the number of cycles of a stimulus/rest paradigm). Special windows are used to do this. These windows are described in the section on fMRI Protocols.
DISPLAY IMAGES: Once a scan has been completed the first image from the data set will be automatically displayed in the interactive graphical window. To review the whole data set select Display Images from the Scanning Page. More details are provided in the section on Displaying Images.
SAVE/DELETE PROTOCOL: If you wish to save your prescribed scan parameters as a protocol for future use then this can be done using the Save/Delete Protocol button. See the section on Saving and Deleting Protocols for details.
NEW STUDY: The New Study buton allows you to start a new study if you are scanning a new subject, or starting a new study on the same subject. To do this, click on NEW STUDY and the Patient Information Entry window will appear, with the automatic generation of a new STUDY ID. Fill in the subject and operator information and continue.
NEW SERIES: If you are continuing the same Study, but are changing the imaging parameters for the next acquisition, then select the NEW SERIES option. The number given to each new Series will follow on sequentially throughout the study.