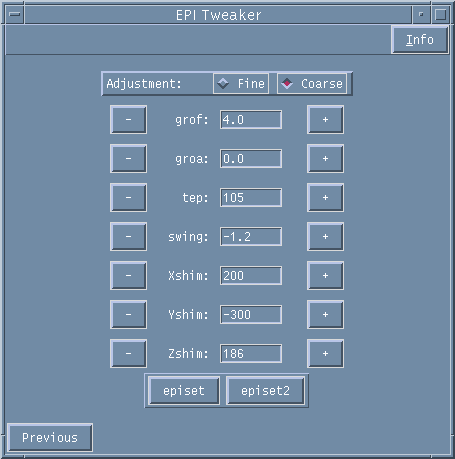
EPI Tweaker Window
EPI at high field strength is considerably compromised by poor magnetic field homogeneity, and as such shimming and eddy current compensation are important for good EPI images. Also, the gradient timing relative to the acquisition statements should be optimized.
To optimize the gradient timings, select Manual Prescan and then EPI Tweaker.

Figure 1. EPI Tweaker page.
This page allows you to adjust four parameters in either Fine or Coarse increments using the + or - buttons. Select your choice of Fine or Coarse using the left-hand mouse on the diamond buttons.
Select EPISET to collect a reference scan that will allow you to visualise the echoes. One of the sources of artefacts in EPI images is caused by a shift of the echo position in the t2 dimension. The echo maxima in EPI should ideally appear centred in the screen with odd and even echoes lined up, and not tilted or swung, as shown in Figure 2.
This can be achieved by altering the gradient parameters (grof and groa) and the timing parameter (tep, which is the acquisition delay time in microseconds to allow for propagation of the gradient pulse).

Figure 2. Non ideal EPI reference scan.
If the echoes appear tilted as in Figure 3 adjust the groa parameter until they line up.
Change the value using the + / - buttons and repeat episet to check the echo position.

Figure 3. Incorrect (a) and correct (b) groa setting.
The swing should also be altered if necessary so that the echoes appear to depart from a tilted rather than horizontal line (Fig. 4).

Figure 4. Incorrect (a) and correct (b) swing setting.
If the odd and even echoes appear to run in parallel, rather than overlapping, lines then adjust the grof parameter (Figure 5).

Figure 5. Incorrect (a) and correct (b) grof setting.
To shift the echo position towards the centre of the t2 direction, adjust the tep parameter.
By selecting episet2 a non phase corrected EPI image is displayed and tep can be further altered to minimise the ghosting in the image.
Select Previous to return to the Manual Prescan page.
Collect EPI Ref
The Collect EPI Ref option on the Manual Prescan page allows you to collect a Phase Reference scan that will be used in the reconstruction of any subsequent EPI functional runs.
A reminder message will appear in the Varian window at the top left when you run EPI scans. It is important to always collect a Phase Reference scan whenever you run the EPI sequence. The Phase Reference scan is saved automatically as (e.g.) series_2.ref.
Once the Phase Reference scan has been collected, one test volume of the functional run can be collected by selecting Conventional Scan. The data collected can then be checked before progressing on to a full functional run.
Quick Look
Quick look is a programme to allow you to take a quick look at your EPI data using an offline IDL reconstruction programme.
To check the EPI data that has just been acquired first bring up a Terminal from the CDE menu (obtained by clicking the right-hand mouse in the CDE background of the screen).
In this terminal type in lower case "quick_look". At the prompt, type in the Vnmr experiment that you are currently in. Check the images for their quality. Exit the quick_look programme by clicking the right-hand mouse in the graph at the bottom left of the screen.