There are a number of steps that can be carried out prior to the statistical analysis of the data. Each of these steps is independent and offers different benefits. There is an analysis time penalty to be paid for each of the steps, some of which can take times of the order of hours. The theory and implementation of each step is described below, with an integrated package explained in the final section.
The raw time data from the scanner requires Fourier transformation to form the image. The raw data is stored as complex numbers, one for each pixel in the image. Correction for N/2 ghost artefact (see Section 4.3.1) can be carried out at this stage by changing the phase angle between real and imaginary data points of alternate lines. The extent of correction required can be determined by eye, adjusting the phase angle until the N/2 ghost in the first image in the set is minimised. The same correction can then be applied to every image in the fMRI data set. Alternatively one of the methods suggested in Chapter 4 can be utilised. Failure to eliminate any ghost artefact can cause activations from within the head to be aliased in the ghost.
Two dimensional fast Fourier transformation (FFT) is carried out using a standard routine[1], with the images being stored as 4 byte signed integers (shorts). The data is also scaled to utilise the whole range of the short data type (+/- 32767).
Two data reducing steps are performed, which cut down on the number of calculations that need to be carried out. Experimental pre-scans (saturation scans), which ensure that the effects of T1 recovery have reached a steady state, can be removed from the beginning of the data set. Also the matrix size can be reduced so that it covers only the brain.
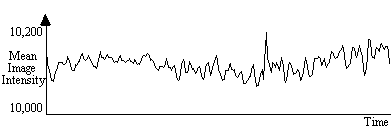
Changes in the global blood flow to the brain (gCBF), as well as instability in the scanner hardware, can cause the mean intensity of the images to vary with time, regardless of functional activity. A plot of the mean intensity of an image of a single slice, acquired every 2 seconds is shown in Figure 6.2.
Such fluctuations mean that the response to each stimulus is not identical, and reduces the power of any statistical test performed. In order to remove this effect, each image can be scaled so that it has a mean equal to some pre-determined value, or to the global mean of the whole data set. Since there are fluctuations in the intensity of the artefact caused by external r.f. interference, which are independent of the variation in the true image intensity, it is necessary to exclude these regions from the calculation of the image mean. Regions to exclude are chosen by the user, prior to the normalisation.
Subject head movement, during the experiment is a major source of artefact in fMRI data. Changes in pixel intensity at the edges of the brain, upon even slight movement, can be far greater than the BOLD activation response. It is common therefore in fMRI data analysis to perform some correction which reduces this effect[2].
The approach taken here is to correct only for in-plane translations and rotations of the head within the image. Working on a slice-by-slice basis, the first image is taken to be the reference image, to which all other images of that slice are to be aligned. Two dimensional rotations and translations are applied to the second image, and the sum of the squares of the difference (ssd) between pixels in the first and second image are calculated. Further translations and rotations are applied to the image until the ssd is minimised, using a standard routine. All subsequent images are realigned in the same way.
This technique is quite robust, and does not have difficulty in converging. One obvious extension of this would be to go to a three dimensional technique. This would have the advantage of more fully correcting the head motion, and would also be a faster technique, but introduces the problem of interpolating the data to give isometric voxels. Additional corrections that could be applied include those which remove cardiac and respiratory effects[3], and those which correct for the history of the spins[4].
Any reduction in the random noise in the image will improve the ability of a statistical technique to detect true activations[5]. Spatially smoothing each of the images improves the signal-to-noise ratio (SNR), but will reduce the resolution in each image, and so a balance must be found between improving the SNR and maintaining the resolution of the functional image.
The simplest form of smoothing to apply is a 9 point filter, such as the one shown below.

If S(x,y) is the image intensity of a pixel at position (x,y) in the image, then upon applying the above filter this pixel will have value
 (6.1)
(6.1)
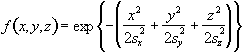
Such a filtering technique is simple and quick, but lacks control of the width of the filter. An alternative is to convolve the image with a three dimensional Gaussian function, of the form
 (6.2)
(6.2)where sx, sy and sz are the standard deviations of the Gaussian in each direction. A good estimate of the extent of such a smoothing is given by the full width at half maximum (FWHM) of the Gaussian kernel. The relationship between standard deviation and FWHM is
FWHM = 2.35s. (6.3)
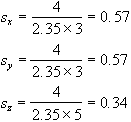
So to smooth an image of resolution 3 x 3 x 5 mm3 with a Gaussian kernel of FWHM 4 mm, the required parameters are
To carry out the filtering, a smoothing matrix is constructed which is the same size as the image. This image matrix is convolved with the smoothing matrix by Fourier transforming both the image and the filter, with a three dimensional FT. Since fast Fourier transformation (FFT) is considerably faster than a discrete Fourier transform, the image and smoothing matrix are zero filled to the nearest 2n points in each direction. The smoothing matrix is scaled so that its maximum point is equal to one, ensuring that the image is not scaled out of the range of the short data type used to store the smoothed image. The two transformed matrices are multiplied together and then inverse Fourier transformed back to give the smoothed image. Such a method of convolution would attempt to smooth the opposite edges of the image with each other, and so zero filling is carried out to the next largest 2n points to prevent this.
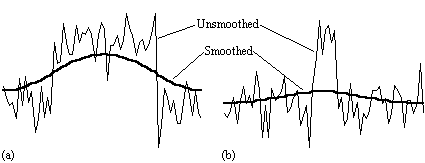
There is no straightforward answer to the question of which is the best smoothing width to use in the analysis of the data set. Standard filter theory shows that the best kernel is one which matches the size of the activation region sought. Thus a filter of FWHM of 4 mm would be optimum for regions of this sort of extent, but may reduce the signal from smaller regions (Figure 6.3). A wider filter will reduce the noise to a greater extent, and so a compromise must be reached.
In practice, for most purposes a FWHM of 4 mm is suitable, but larger filters may be useful if the signal to noise ratio is particularly bad, and the activation expected to cover a large area, whilst a narrower filter can be used if the SNR is good enough. An example of the use of three different filters in the analysis of the same data set is shown in Figure 6.4.
(a)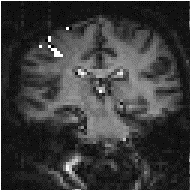 (b)
(b)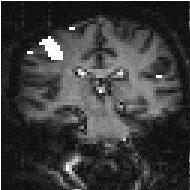 (c)
(c)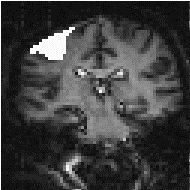
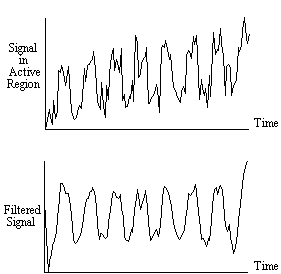
As well as smoothing in the spatial domain, improvements in the signal-to-noise ratio can be made by smoothing in the temporal domain. Since the BOLD contrast effect is moderated by blood flow, the rate at which the signal changes, in a genuinely activated region, is limited. Therefore smoothing each pixel's time series with a filter of similar shape will improve the SNR. From our observations, and figures quoted in the literature[6], a Gaussian of width 2.8 seconds, is a good approximation to the haemodynamic response function, and so this is used to smooth the pixel time courses.
As well as removing the high frequency fluctuations from the time series, it can be beneficial to remove any long term drift that may appear in the data. Such drifts can arise from instability in the scanner hardware, and will reduce the power of the statistical technique in detecting activations.
Both types of temporal filtering are carried out in the Fourier domain. First, an appropriate Gaussian vector, with the same length as the time course, is constructed using the function
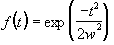 , (6.4)
where w is the width of the Gaussian. This function is Fourier transformed, scaled so that it has a maximum value of one, and the Fourier components from 1 to n-1 are set to zero, where n is the number of cycles in the fMRI experiment. This high-pass filtering will remove low frequency variations in the data, without significantly altering signals correlated to the stimulus. For each pixel in the image, the time course is extracted, Fourier transformed, multiplied by the filter, and inverse Fourier transformed. To use the fast Fourier transform technique it is necessary to have a vector of length 2n. Zero filling can therefore be employed, but it is necessary to subtract the mean from the time course prior to this, to avoid undesirable steps in the data. This mean is added back on to the data after filtering. The effects at the ends of time course must be taken into account, particularly if there is a lot of drift in the data. Figure 6.5 shows an example of a time course taken from a 8 cycle experiment, prior to filtering. Upon filtering, the effects at the edge of the data can be seen. This can reduce the power of the statistical test used, and it might be necessary to exclude the first and last cycles from the statistical analysis.
Experience has shown that care must be taken in using the temporal filtering, particularly in the way that it affects the independence of the data points, a subject covered later in this chapter. However, the improvement in the detection of activation that results, justifies its use.
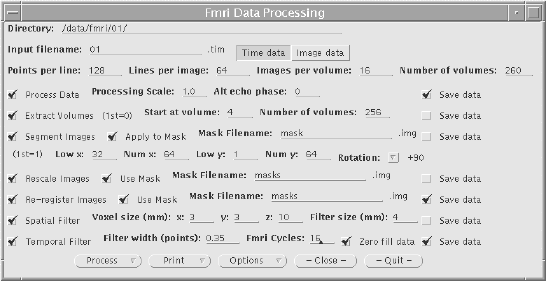
Each of the above pre-processing steps was coded as a separate 'C' program[7], reading in the data from one file, and outputting it to a new file. Each step takes a reasonable amount of time; a few hours for the registration and tens of minutes for the two filtering steps with data sets of a few thousand images. The programs were therefore joined to form a single pre-processing software suite. The programs were rewritten as functions, with the parameters such as file names and matrix sizes being passed from a main routine. Each step still saves its output in a file, but the software automatically deletes the files once they are no longer required, meaning that less disk space is taken up during the processing. The input parameters for the program are read from an initialisation file. This initialisation file is produced by a separate graphical user interface, allowing the main processing to be run in the background on a UNIX workstation, with no terminal input required once the program is started.
The graphical user interface (GUI) is shown in Figure 6.6. It allows the selection of some or all of the steps to be carried out on the data. Upon completion of each step, the file name is appended with a letter, so that the pre-processing that has been carried out on that file can easily be seen. If all the processing steps are carried out the files will be named
For any image files that are created, a header file compatible with the Analyze display software[8], is also created. Other features of the GUI include the ability to start the processing at a later time specified by the user, and the option to print out the settings used, which can be kept as a record. The GUI was written in 'C', using the xview, library routines. The time taken to pre-process fMRI data is significantly reduced using the new software, largely because all the steps can be set off to run in a few minutes, and allowed to run without the need for user interaction, overnight if necessary.
The user instructions for the fMRI pre-processing package is included as Appendix B.