Graphic Prescription Scanning Range
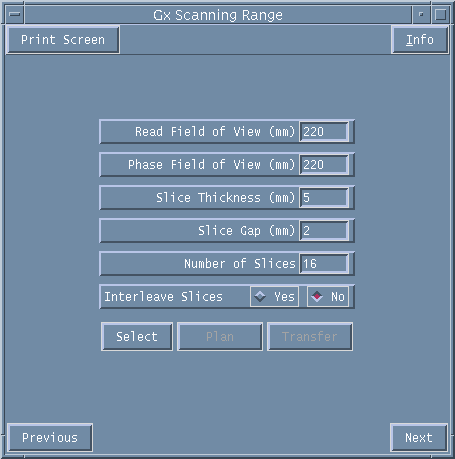
If you chose Gx (graphic prescription) on the Sequence Information page the window shown in Figure 1 will be displayed. Instead of explicitly typing in the Start and the End positions of your slices, this option allows you to graphically plan a slice or a block of slices.

Figure 1. Oblique Scanning Range menu window.
As for the Explicit Scanning Range menu, you will need to manually enter in mm the Field of View, the Slice Thickness and the Slice Gap you require. Next, type in the Number of Slices required.
INTERLEAVE SLICES: Use this option to select either interleaved slice acquisition (slice 1, 3, 5, 7 collected, followed by slice 2, 4, 6, 8 etc. in a TR period) or sequential slice acquisition (slice order 1, 2, 3, 4, 5, 6, 7, 8 etc. in a TR period). Interleaved acquisition is advised for spin echo acquisitions. Note that this option is not available for true 3D sequences.
Next you need to recall a previously collected image (from the current study) from which to graphically prescribe the slices for the current series.
Selecting a Plan Image
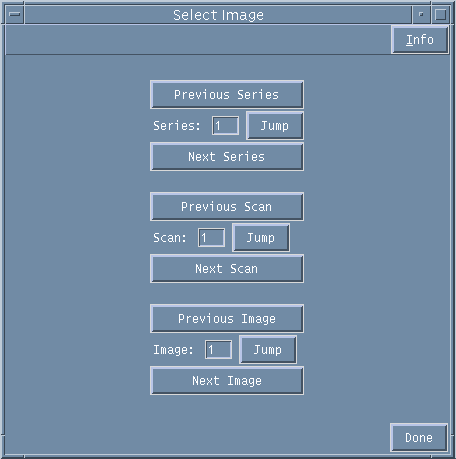
First you need to select an image from which to plan. Click on the SELECT button to bring up the window shown in Figure 2.

Figure 2. Image Select menu window.
If you know the Series Number, Scan Number and/or Image Number of the image you wish to plan from you can type it in the relevant box/boxes and press JUMP to select it. Alternatively use the NEXT and PREVIOUS buttons to page through the images. Select DONE when you have made your choice to return back to the Oblique Scanning Range page. The plan image should be displayed on teh graphic screen. You may wish to adjust the greyscale settings to optimally display the image.
Graphically Planning the Slices
Click on the PLAN button on the Oblique Scanning Range page and now move over to the menu buttons on the Vnmr console (above the interactive graphic window displaying your chosen image).

Figure 3. Vnmr Plan menu bar
First select SLICE/VOLUME. This will bring up a different menu bar, as shown in Figure 4.

Figure 4. Vnmr Mark 1 menu bar
You are now ready to prescribe the slice orientation and to position the centre slice of your slice block. The slice number parameter that you have already chosen, together with the slice thickness and gap, will determine the coverage you will get either side of this central slice. The full slice block will be displayed graphically. If the slice coverage is not sufficient then return to Oblique Scanning Range and adjust the relevant parameters.
In order to define the orientation of the desired slice prescription, you will mark two points on a line through the plan image which define where the central slice of the block should pass. For example, if you wish to prescribe an axial slice block from a sagittal plan slice, you would therefore mark one point on the left side of the plan image and one on the right side. If, however, you wish to prescribe a coronal slice block from a sagittal plan image then you should select one point on the top of the image and one on the bottom.
To select your first point press MARK 1 and deposit the cursor using one click of the left-hand mouse on the plan image. The menu shown in Figure 5 will then appear.

Figure 5. Vnmr Mark 2 menu bar.
Select MARK 2 and deposit the cursor on the plan image to mark the second point. The menu bar shown in Figure 6 will then appear.

Figure 6. Vnmr Compute Target menu bar.
Select COMPUTE TARGET to confirm and display your slice prescription.
If you want to change the position of one or both of the marked points at any stage then select CLEAR (see Figure 6) and reposition using the above steps.
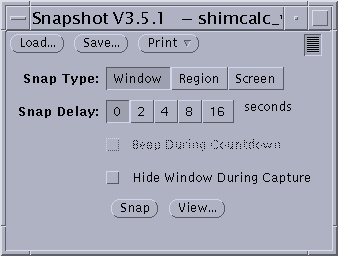
If you wish to retain a permanent hard copy of your slice prescription, you can use the SunOS Snapshot tool to capture a screen shot of it. The Snapshot tool can be found in the CDE menu brought up by clicking the Right-hand mouse in the background CDE screen.

Figure 7. CDE Snapshot Tool menu
Select Region and use the left-hand mouse to delineate the area of interest. Snap the region and the snapshot can then be printed out for a permanent record.
Once you are satisfied with your prescription select TRANSFER on the Oblique Scanning Range page of the XVNMR programme.
Prescribing slices using a previous slice orientation and/or slice position
If you want to prescribe the slices for a new acquisition to match a previous acquisition (e.g. planning a structural scan to match the slice orientation and position of a functional data set) then this can be done very easily. The XVNMR programme stores the orientation and the position of the central slice of the most recent prescription and allows you to prescribe a new series utilising these parameters, but allowing you to change any of the other parameters.
From the Oblique Scanning Range page first select the image you need to plan from (see Selecting a Plan Image). The plan image you select MUST have the same orientation and field of view (ideally it should be the same image) as was used to plan the prescription you want to match.
Next select the Field of View, Slice thickness, Slice Gap and Number of Slices for this prescription. Select PLAN to bring up the Varian window (see Figure 3) and then SLICE/VOLUME. The menu in Figure 8 will be displayed.

Figure 8. Vnmr Use Most Recent menu bar.
By selecting USE MOST RECENT the slices for your new prescription will be brought up in the same orientation and central position as before. The prescription will be displayed graphically in the interactive window.
Select TRANSFER as before to download these parameters.
Use the NEXT button to move on to the next menu page.